By Mar Jennings
I’m a firm believer that we should surround ourselves with living things – people, pets and plants. This sMart tip is about the natural beauty of indoor terrariums. I’m no stranger to this concept, so much so I wrote another article about a Marvelous glass garden, but this is different. Now, we’re going topless!
Recently the garden lifestyle store Terrain opened a new flagship in Westport, Connecticut and I became a huge fan while discovering many wonderful things for my home and garden. One feature that took my breath away was the plethora of topless terrariums and of course I needed to have one – okay, maybe two. I adore them and I quickly wanted to learn how I could reproduce the same look in various sizes to give as gifts.
It didn’t take long before I was making my own version of these portable gardens. Thanks to Terrain’s collection of decorative rocks and plant materials, it became easy to do at a fraction of the cost. Now, don’t get me wrong! If you’d like to splurge and purchase one already made I recommend going to their store and picking one up. They are beyond compare, but for the many people who don’t live in the area I wanted to deconstruct the process so you too can enjoy “going topless” with a glass garden container.
It’s easy and you’ll love the creativity of the process. You’ll be able to assemble yours in about 30 minutes.
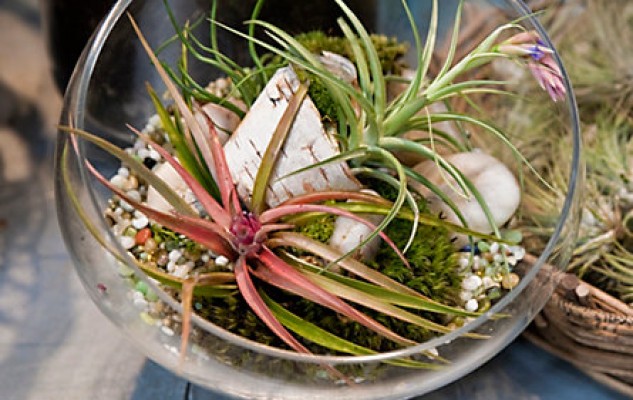
Here’s what you’ll need:
A container. While you can find containers that are sold specifically for terrariums, any glass vessel that has walls will do. Depending on how big and fancy you want to get, the glass containers are always best to get from an off-price store. I pay no more than twenty bucks. Anything from a large fish bowl to a small vase – as long as it’s open you’re good to go.
Horticultural Charcoal. Terrariums are damp environments with no drainage holes, so the charcoal will keep the soil from developing a sour odor. This can be easily found at nurseries or at pet stores in the aquarium department.
Stones or pebbles. These won’t be very visible, so any kind will do. You’ll need a couple of handfuls – enough to create a shallow layer.
Decorative rocks or moss. These will be visible to layer on the surface. A sheet of moss or a few handfuls of rocks are enough. Sheet moss is available at garden centers, and small rocks can be scavenged from nature or you can use aquarium rocks.
Potting Soil. The best soil for terrariums is a high quality, sterile potting soil because it has a high amount of organic matter.
Plants. Before you purchase plants, first determine where you’d like to place the terrarium, because light conditions and temperature will affect your choice of plants. All the plants should have similar requirements. Low-growing, dense plants are best. If you’re not sure simply ask at your garden center. A benefit to topless terrariums is that you can also use succulents, which don’t do well in closed terrariums because of the humidity. Make your selection based on size, color and texture.
Decorative Items. This is often my favorite part because you can really be creative and personalize it even more. You’ll use these to create dimension and structure at your top level, in amongst the plants. One or two pieces per terrarium is plenty. I like to use driftwood, bark, decorative rocks, pottery pieces, etc.
Assembly Steps
Drainage layers: Because terrariums do not have drainage holes in the bottom you need to create somewhere for the excess water to go, away from the plants’ roots. First add about an inch or so of charcoal, then your two handfuls of stones or pebbles.
Potting soil: Spoon in about three-four inches of potting soil (depending upon the vessel; you don’t want to go all the way to the rim!)
Design: Before you place your plants, finalize the design of your terrarium. Will it have a back and front? If so, them place the taller plants in the back. If not, place them in the middle. I love to contour the soil so it creates more of a landscape.
Contouring plus the small-sized plants combine to create the effect of a miniature world.
Plants: Use your fingers or a spoon to create an opening in the soil for each plant. Tip: Before placing each plant in the soil I prefer to quickly soak the roots in a cup of water—this helps give them a jump-start of moisture. Place each plant into the soil and gently pat them in. Do not overcrowd them.
Coat top layer with decorative rocks or moss strips for that natural organic look. Place any decorative item(s).
First watering: Add about ¼ cup of water per plant; try to distribute the water evenly.
Maintenance
Simply water the plants in your terrarium weekly – possible less often if the top layer of soil feels moist to the touch. Want to water even less often? If watering once every six months is more appealing, consider creating covered, enclosed terrariums. Who knew that going topless was possible year-round?
And there you have it. Simple, fun, and so decorative!
Image source: Terrain, Spotlight Terrarium
 Mar Jennings’ inventive and original blueprint for design infuses Mother Nature’s colors and textures throughout the home and garden. Mar creates resourceful designs for a casual luxury lifestyle. As featured in HGTV, QVC, the Today Show, NY Times and many other national media outlets. For more information visit MarJennings.com.

This Week's Articles Read, learn, live
-
 Summertime grilled vegetables
-
 5 Ways to make this summer full of unforgettable family fun
-
 10 Reasons to take a family vacation in Puerto Vallarta
-
 5 Fun tips for spring cleaning with kids
-
 10 chick flicks with New Year’s Eve scenes
-
 The day after Christmas: 5 ways to handle the biggest downer of the year
{ 1 trackback }